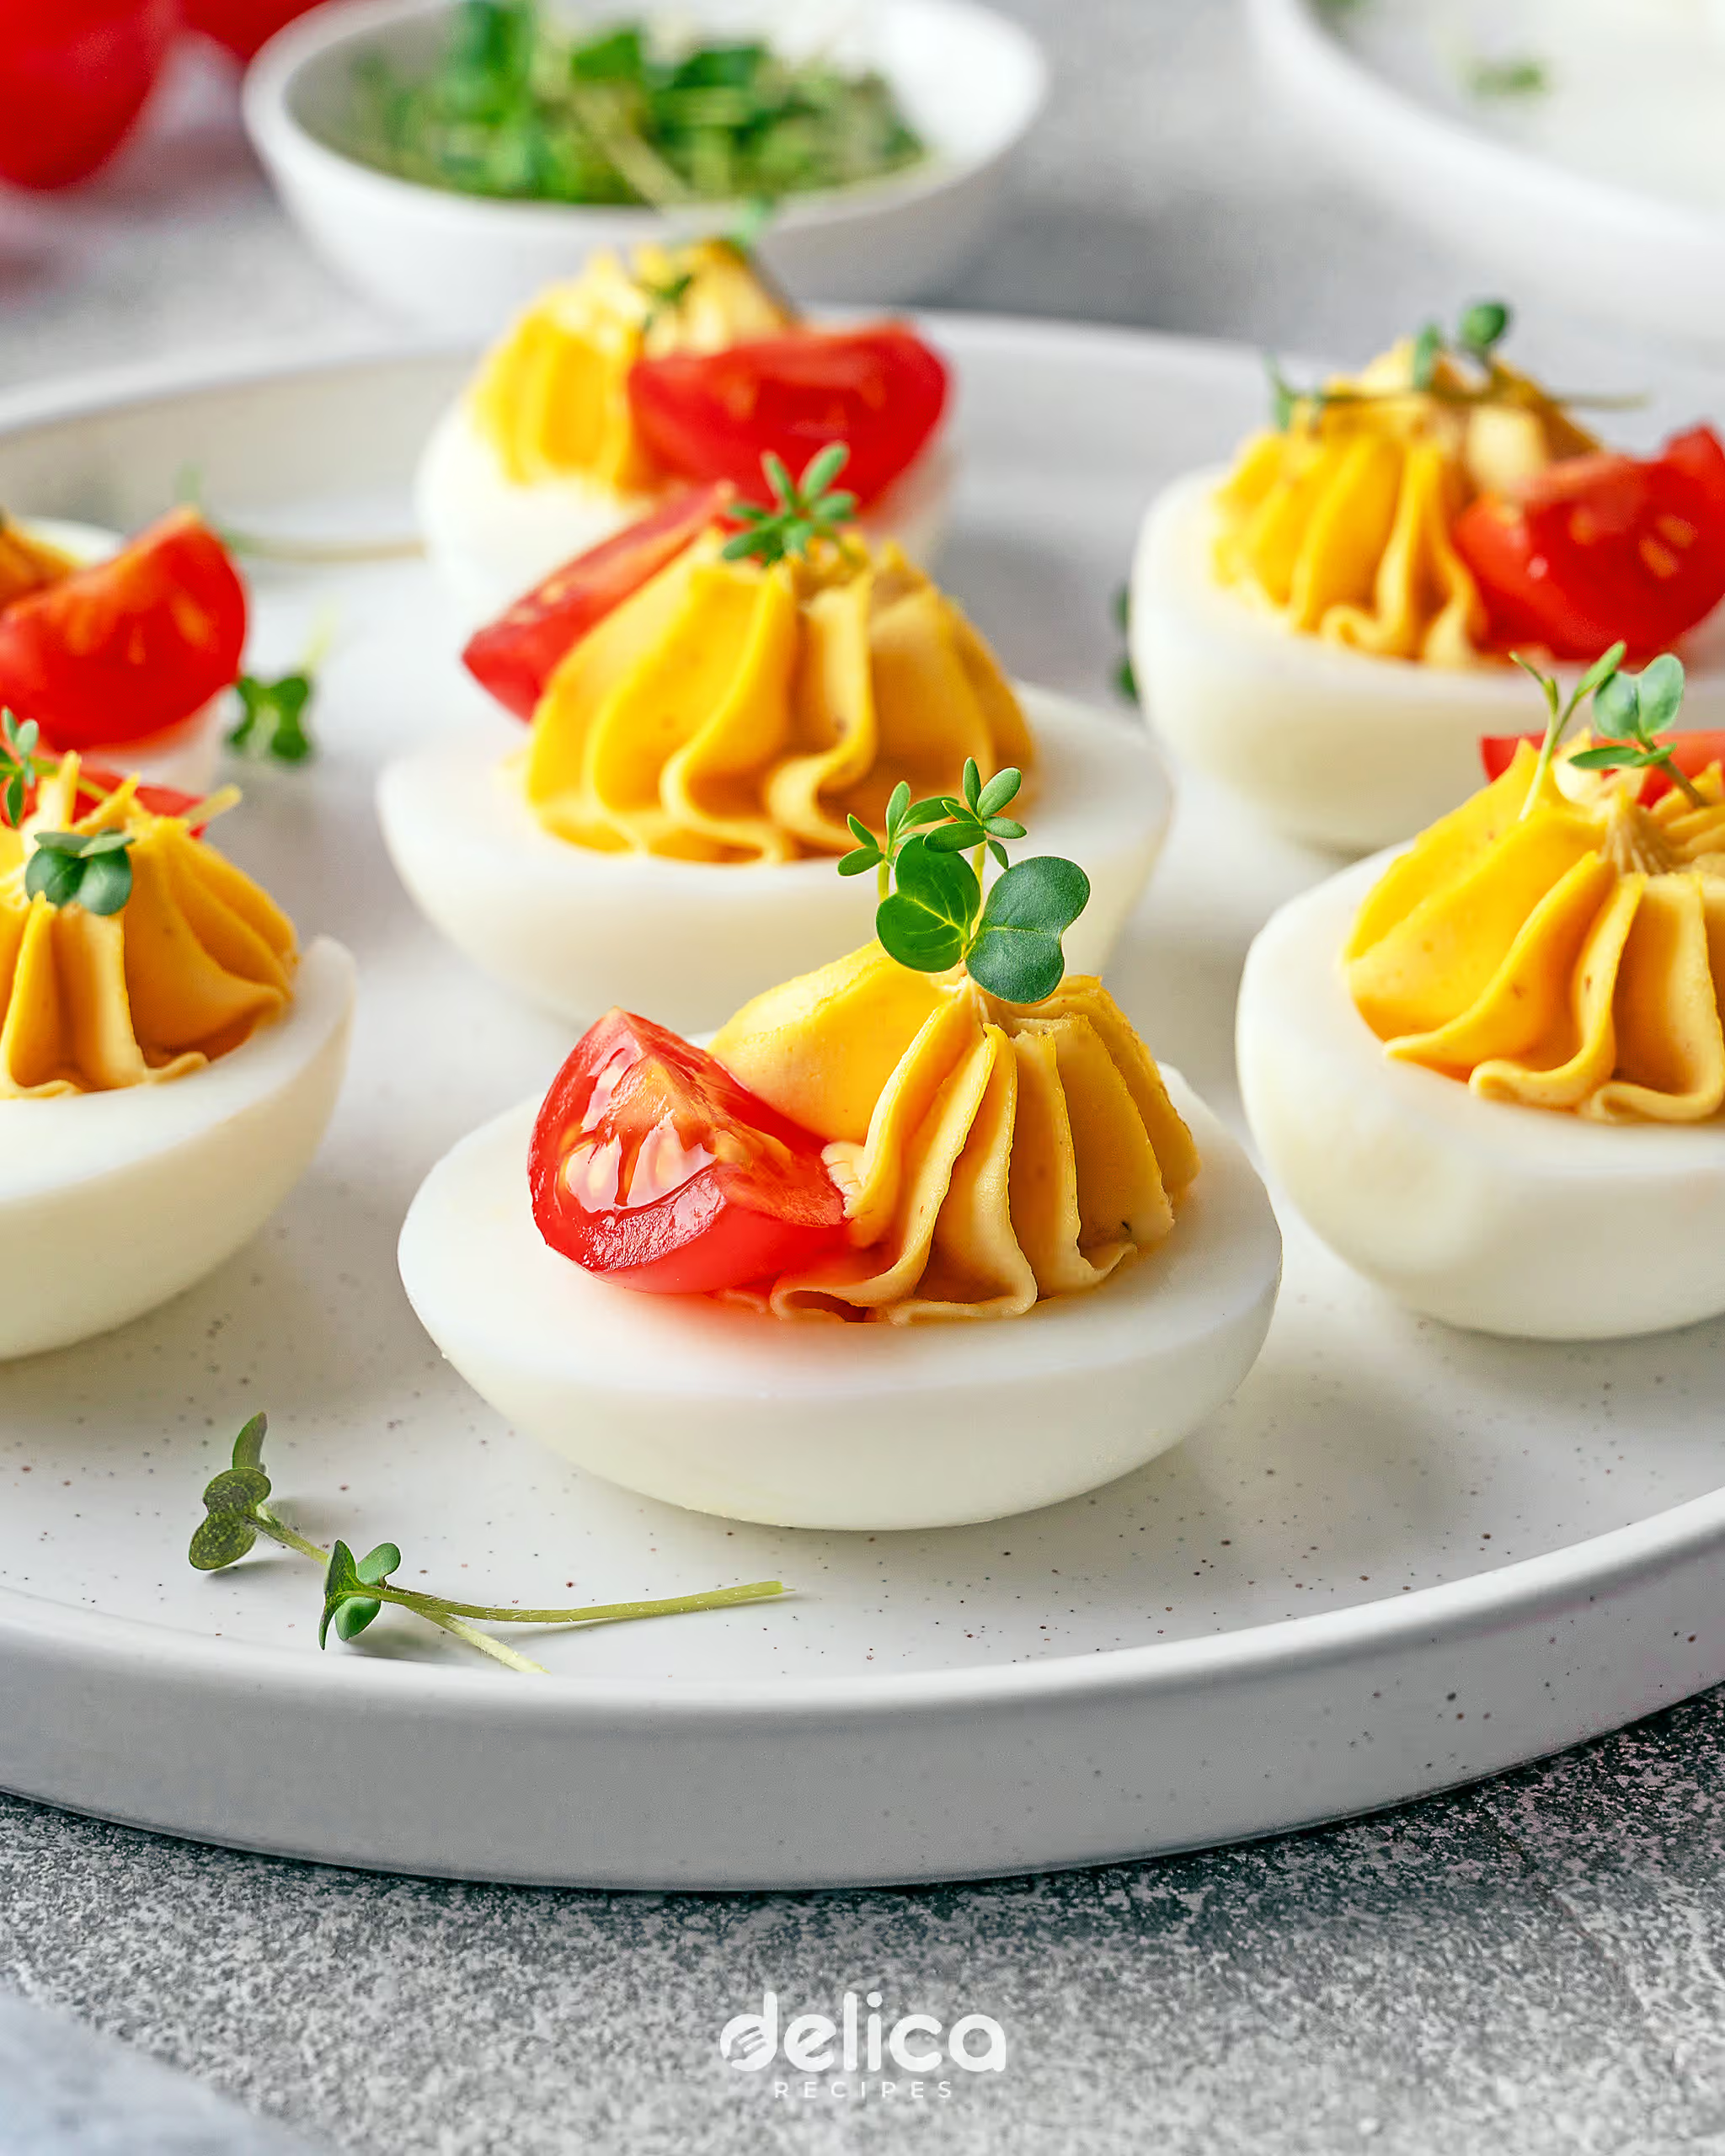
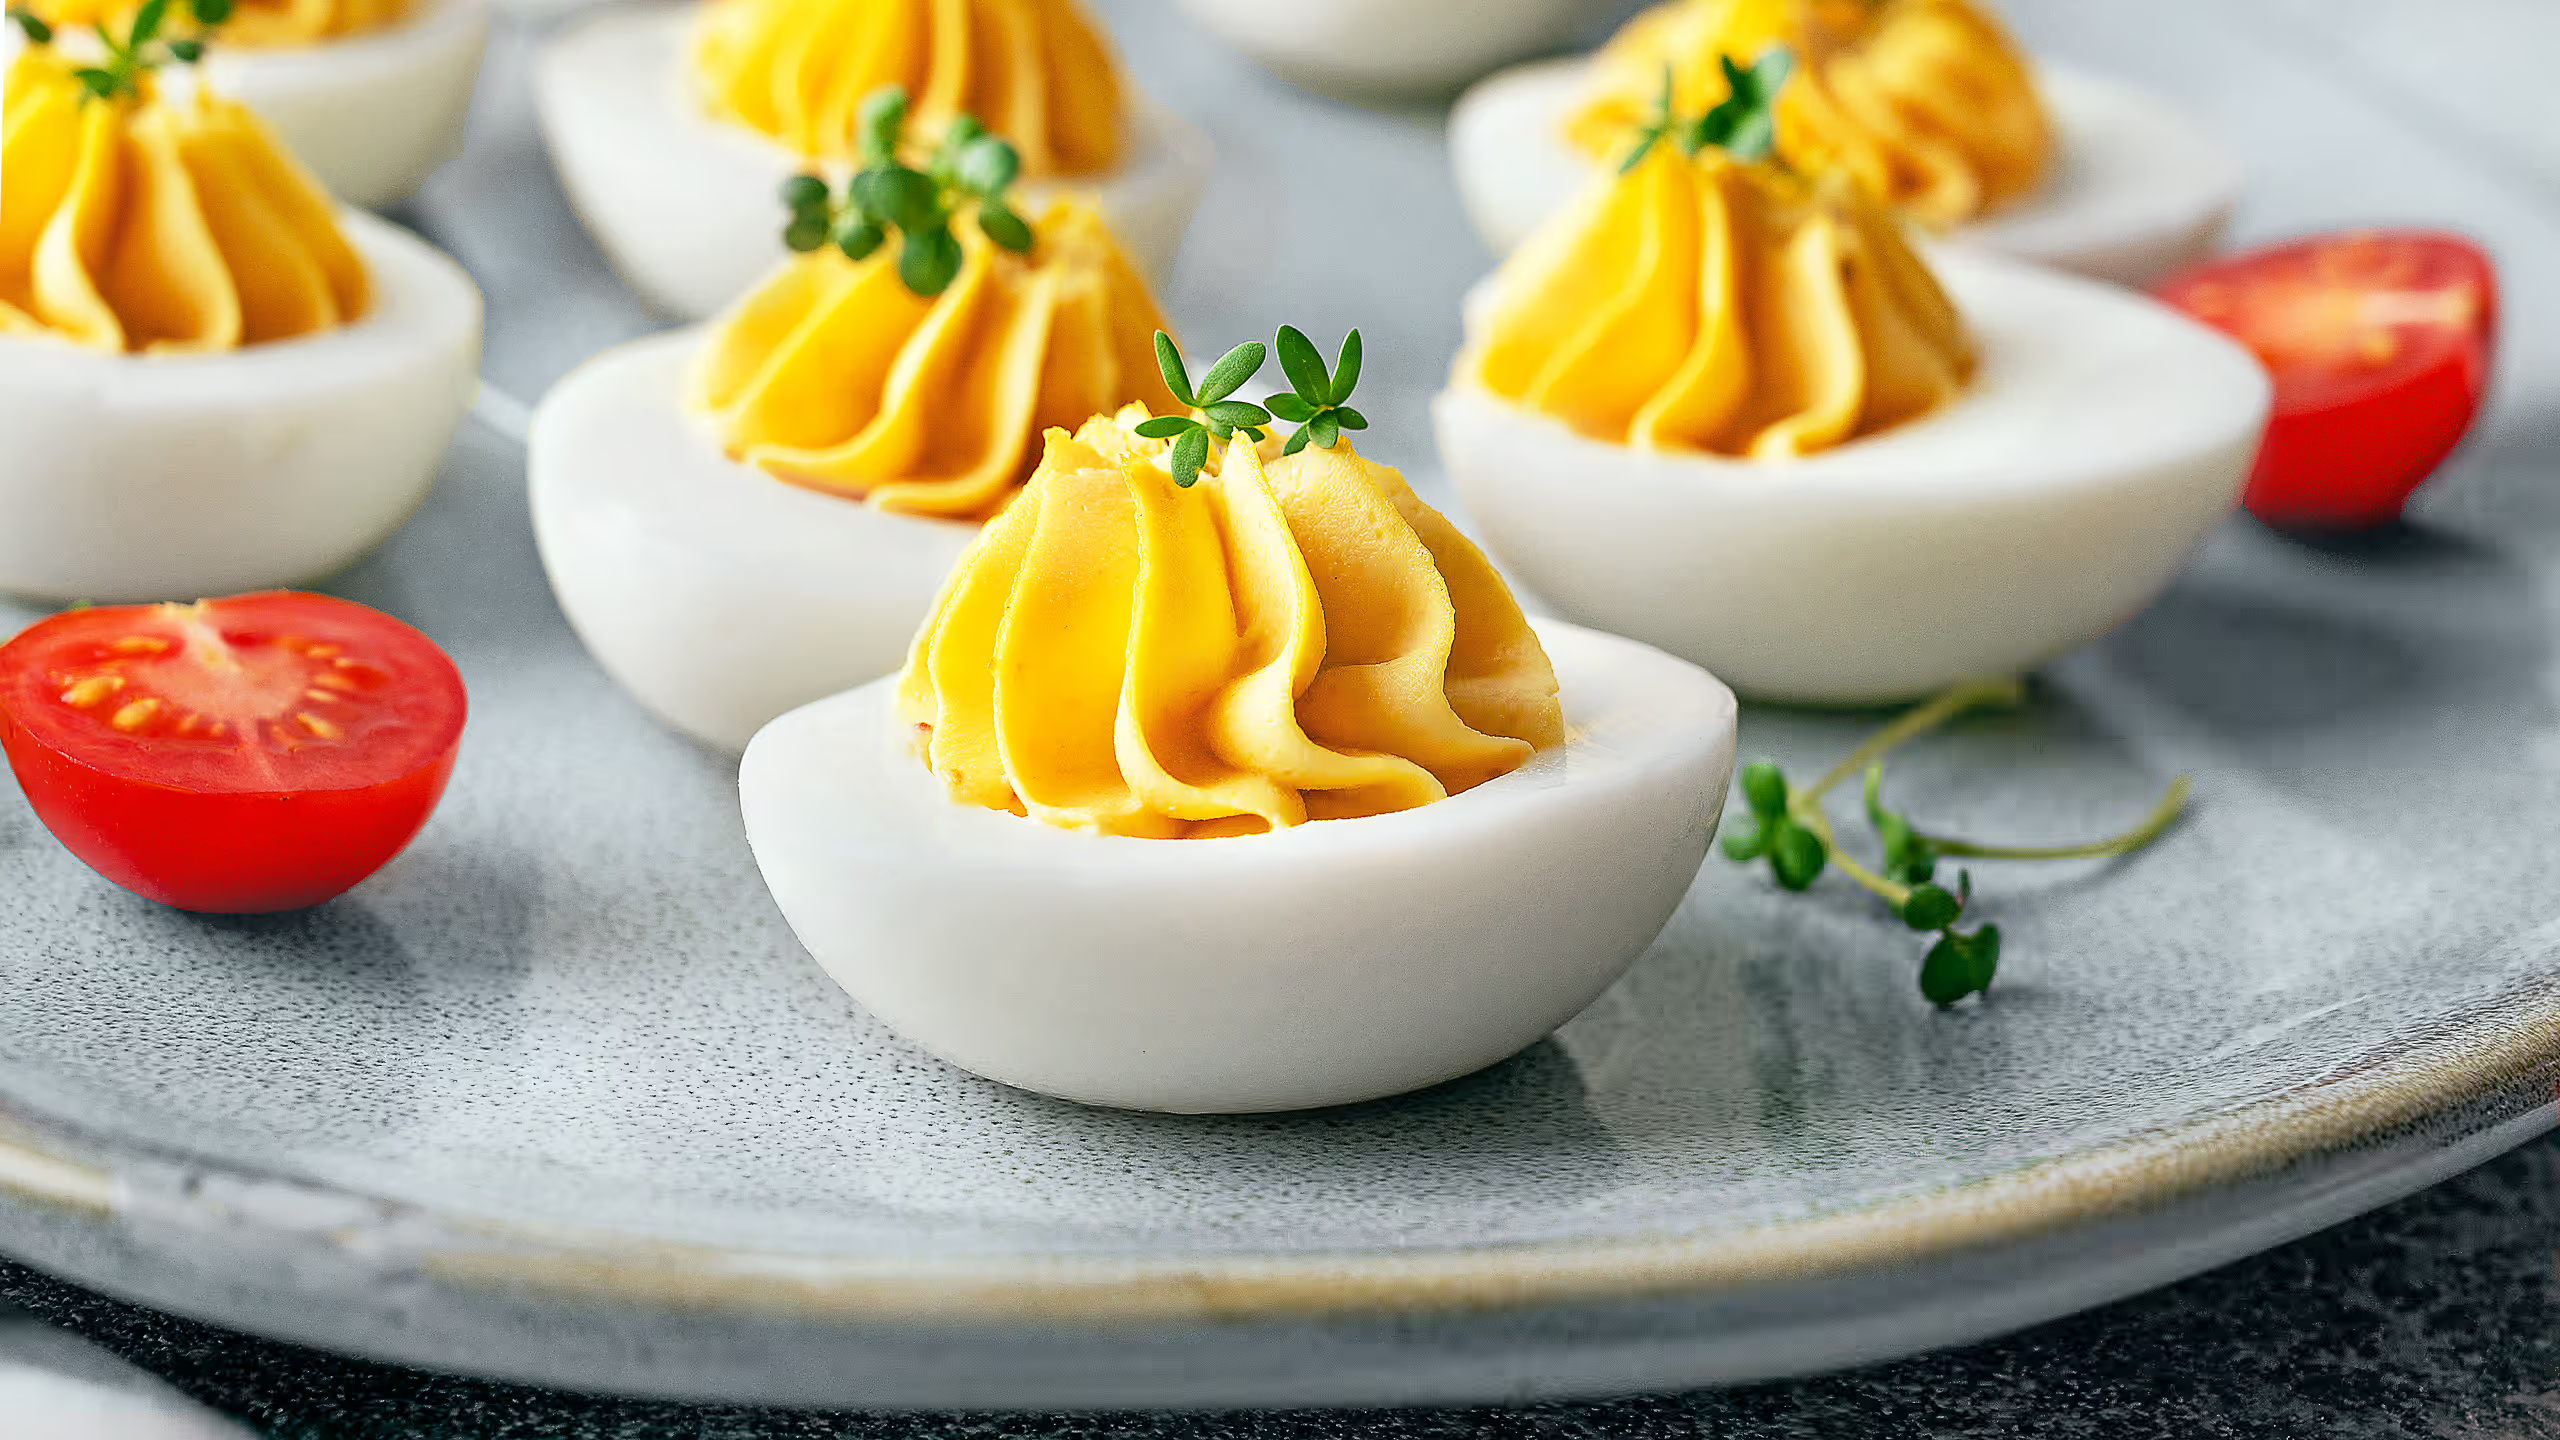
Deviled eggs are one of those classic appetizers that fit just about any occasion – parties, potlucks, and holiday tables like Easter, Thanksgiving, and Christmas. What makes these different? The filling actually holds its shape, the whites come out smooth without craters, and the yolk sits perfectly centered. On top of that, they’re quick to make, use simple ingredients, and easy to prep ahead – which is exactly how I end up making them on random Tuesdays too. Once you have a go-to recipe, you’ll find any excuse to make them.
Every time I bring these somewhere, the same thing happens. The platter goes down, and they rarely make it past the first hour. Someone always pauses to take a photo before eating. Someone else asks what’s in them. That reaction is exactly why I keep coming back to this recipe.
I also love how naturally they fit into a bigger spread. When I’m putting together a brunch table, I’ll often pair them with my cucumber sandwiches for something light and fresh, French toast for a warm cozy touch, or hash browns when I want something crispy on the side.
What are Deviled Eggs?
Deviled eggs are hard-boiled eggs cut in half, with the yolks mixed into a creamy, tangy filling and piped back into the whites. Simple idea – but somehow they turn into one of the most popular appetizers at any gathering.
The name itself always makes people curious. Have you ever wondered why they’re called “deviled” eggs? The word has nothing to do with anything dramatic. Back in the 18th century, “deviled” simply used for food mixed with mustard, vinegar, or pepper – basically anything with a little kick. So these eggs aren’t evil, they’re just well seasoned.
Depending on where you are in the world, they also go by different names. Across much of Europe they’re often called stuffed eggs. In parts of the American South you might hear dressed eggs. And in France they’re known as mimosa eggs – named after the flower, because the crumbled yolk on top looks like its bright yellow blooms. Honestly, mimosa eggs might be the prettiest name of the bunch. But “deviled eggs” has a certain ring to it, and the name stuck around for more than two centuries.
Whatever you call them, they’ve been a party-table fixture for over a century. There’s probably a reason for that – and we’re about to get into it.
Why This Is The Best Deviled Eggs Recipe
Most deviled eggs I’ve tried share the same flaw. The filling is runny, it spreads almost flat in the whites, and any attempt at a pretty swirl collapses within minutes – by the time the plate reaches the table it looks more like a mess than an appetizer. Because I actually love deviled eggs, I started playing around – with the filling, with the boiling method, with everything. This is the version I landed on, and here’s what makes it different:
- Creamy filling that holds its shape. The filling pipes into clean, defined swirls that stay exactly where you put them. No sliding, no spreading, and definitely no mystery blob situation on the plate.
- Smooth whites and perfectly centered yolk. A simple boiling method takes care of all three at once – no shell that fights back, no crater-covered eggs, and no yolk drifting to one side. Just clean, even halves ready to fill.
- Quick and easy to make. 25 minutes, 7 ingredients you probably already have, and a result that looks far more impressive than the effort involved.
- Perfect for making ahead. The eggs and filling can be prepped separately days in advance – so when the moment comes, all you have to do is assemble and serve.
- A crowd-pleaser that’s endlessly versatile. Deviled eggs tend to vanish fast wherever they’re served. And with my favorite variations coming later in this post, everyone can find the version they love most.
Behind all of this is a surprisingly short ingredient list. Let’s go through it.
Deviled Eggs Ingredients
The beauty of deviled eggs is that you only need a handful of ingredients – nothing fancy, nothing hard to find:
Eggs. If you’ve ever wondered about the best eggs for deviled eggs, large ones are the best choice. The whites are just the right size to hold a generous swirl of filling without looking overcrowded.
One thing worth mentioning – slightly older eggs peel far more easily than very fresh ones. If I’ve just picked them up from the farmers market, I usually let them sit in the fridge for a few days first. Believe me, you’ll thank yourself later.
Mayonnaise. This forms the base of the filling. I use full-fat mayonnaise as it gives the creamiest and most stable result. Light mayo tends to make the filling thinner and less stable.
Mustard. Both Dijon and yellow mustard work well here, just in different ways. Yellow mustard is the more classic choice and gives a bolder, tangier flavor. Dijon is a little more subtle, with a rounder taste that blends into the filling without becoming too dominant – that’s what I use and personally prefer. Go with what you have or what you know you like.
Butter. Yes, butter – and this is the ingredient that surprises people. Very soft, room-temperature butter (not melted!) blended into the yolks adds body and silkiness that mayo alone simply can’t replicate. It’s exactly what keeps that clean piped swirl holding its shape on the plate instead of spreading flat. Most recipes skip this entirely, which is why many deviled eggs look the way they do.
Vinegar. A splash of vinegar keeps the filling from feeling too heavy. Apple cider vinegar is my preference – mild, slightly fruity tang that balances the yolks beautifully. White wine vinegar works as well and gives a cleaner, more neutral tang.
If you want a slightly different twist, pickle juice is a popular option and adds a little more savory note. And if none of those are on hand, a squeeze of fresh lemon juice does the job too. Any of these will work, but I always reach for apple cider vinegar first.
Seasoning. Less is more here. A small pinch of salt and black pepper is all the filling really needs – the yolks do most of the work on their own.
With the ingredients sorted, let’s look at how to turn them into smooth, perfectly shaped deviled eggs.
How to Make Deviled Eggs
There are a few things in this recipe that look simple but are worth doing right. Here’s everything I’ve figured out along the way – and trust me, some of these took a few failed batches to learn:
How to Boil Eggs for Deviled Eggs
Most deviled egg problems actually start here. Eggs that are hard to peel leave the whites looking cratered and rough – and no amount of beautiful piping can really fix that.
Start with already-boiling water, then reduce the heat slightly to keep it at a steady boil without aggressive bubbles that can crack the shells. Carefully lower the fridge-cold eggs into the water using a slotted spoon or spider strainer. That sudden temperature shift actually helps later – it creates a slight separation between the shell and the egg white, which makes peeling much easier.
Here’s the trick for perfectly centered yolks – and it took me a while to land on this one. I’d tried storing eggs pointy-end down in the fridge, rotating them before boiling – but neither was reliable enough.
The only method that consistently delivers: once the eggs are in, gently stir the water to keep them slowly swirling. I always use a large pot so they have room to move. As they roll around, the yolk stays centered while the white sets around it. Keep stirring gently for the first couple of minutes, then leave them to finish cooking undisturbed. Every half comes out with the yolk right in the center – even whites, no paper-thin edges, every single time.
How Long to Boil Eggs for Deviled Eggs
Timing matters more than most people think. Undercooked eggs leave the yolks soft and sticky, while overcooked ones develop that grayish ring and a chalky texture that won’t mash smoothly no matter how hard you try.
For deviled eggs, my sweet spot is 10 minutes from the moment the eggs hit boiling water. That gives you a yolk that’s fully set, still bright yellow, and smooth enough to blend into a creamy filling.
That said, size makes a difference. For very large eggs I’ll add an extra minute, and for medium eggs 9 minutes is usually enough. The goal is always the same – a firm yolk with a bright yellow color that hasn’t gone dry or crumbly.
One thing I always do – set a timer. Eggs are unforgiving when it comes to timing, and a minute too long is all it takes to ruin the yolk texture. Don’t risk it.
How to Peel Hard-Boiled Eggs
Once the timer goes off, transfer the eggs to a large bowl of cold tap water for about 10 minutes. The bowl size actually matters here – a small bowl warms up too quickly from the hot eggs and stops doing its job. You need enough cold water to keep the temperature down long enough to stop the cooking completely.
I’ve tried the ice bath too, but honestly couldn’t tell the difference – so I stopped overcomplicating it. Cold tap water works just fine, no freezer raid required.
When you’re ready to peel, find the wide end of the egg – that’s where the air pocket sits – and give it firm tap on the counter. Rolling the whole egg was something I tried for a while, but honestly it created more problems than it solved: lots of tiny shell fragments that are harder to remove cleanly, and one wrong squeeze can tear the white. So one tap, then peel under cold running water – much cleaner and much easier.
How to Cut Hard-Boiled Eggs
Once the eggs are peeled, slice them in half lengthwise with a sharp knife. Dragging a dull blade through the white tears the edges and undoes all the work you put into getting those smooth, crater-free whites.
One thing I always do – wipe the knife clean between each egg. Yolk residue on the blade drags through the next white and leaves a yellow smear along the cut edge. Ten seconds of extra effort, but much better result.
I’ve also tried the rolling trick, where you place the knife across the middle and gently roll it through the egg. It sounds clever, but in practice I didn’t find it worth it. A sharp knife gives you much more control and a cleaner cut, which is exactly what you want for neat-looking deviled eggs.
How to Make Deviled Egg Filling
Getting the filling right is mostly about texture. It sounds obvious – just mix everything together – but how you mix it matters more than you might think.
A fork can do the job, but it rarely gives you that really smooth, creamy finish. For a filling that pipes neatly and looks polished on the plate, a hand blender works much better. Trust me, I tried to get away with just a fork for longer than I’d like to admit, but once I switched, I never went back.
Just break the yolks up roughly first, then blend everything until smooth and uniform. You’ll notice the difference immediately.
How to Fill Deviled Eggs
Once the filling is ready, you can go several ways. You can absolutely fill deviled eggs with a spoon – and for a relaxed family dinner or just for yourself, that’s completely fine.
But if you want that clean, defined swirl that makes deviled eggs actually look impressive on a plate, a piping bag is the way to go. I usually use a piping bag fitted with a large star tip, like a Wilton 1M, which gives a clean rosette shape.
And if you don’t have a piping bag, a zip-top bag with one corner snipped does the job too – just a slightly simpler shape, but still a hundred times neater than a spoon.
These are those little things I picked up along the way – and they genuinely changed how my deviled eggs turned out. Now, if you’re feeling adventurous and want to mix things up beyond the classic, my seven favorite variations are coming right up.
Top 9 Deviled Egg Variations
Here are the my top 9 variations. Some are simple twists, some are more of a project. But all of them are worth having in your back pocket:
Classic Deviled Eggs
This is the version in the recipe card below, and it’s the one I’d start with before trying anything else. Smooth, creamy filling, a neat piped swirl, and that classic tangy flavor that never gets old.
Bacon Deviled Eggs
Make the classic filling and top each egg with a small strip of very crispy bacon and a scattering of snipped chives. The bacon needs to be genuinely crispy – soft bacon loses its texture within minutes of hitting the filling. The contrast of crunch against the creamy yolk is what makes this variation so good at parties.
Avocado Deviled Eggs
Replace about half the mayo with mashed ripe avocado. The filling tastes fresher, turns a beautiful pale green, and fits perfect for spring and brunch tables. I’d still keep a little mustard or lemony brightness in there so the filling doesn’t taste too flat. One thing to keep in mind – avocado oxidizes, so these are best eaten the same day you make them.
Relish Deviled Eggs
Stir a spoonful of sweet pickle relish into the classic filling. This is the old-school Southern American version – a little sweeter and tangier than the basic recipe. If you grew up eating deviled eggs that tasted slightly sweet, this is probably the version you remember.
Spicy Deviled Eggs
For anyone who always reaches for hot sauce, this one is easy. Add a few dashes of hot sauce – Tabasco or Frank’s RedHot both work well – and a pinch of cayenne to the filling. Top with a thin slice of pickled jalapeño. If you want smokiness alongside the heat, smoked paprika on top does a lot of the work.
Smoked Salmon Deviled Eggs
These feel a little more elegant straight away. Top each egg with a small curl of salmon, a few capers, and a pinch of fresh dill. Honestly, these are my favorite variation on the whole list. The salty, smoky depth against the creamy yolk just works – and they look beautiful on the plate without any extra effort.
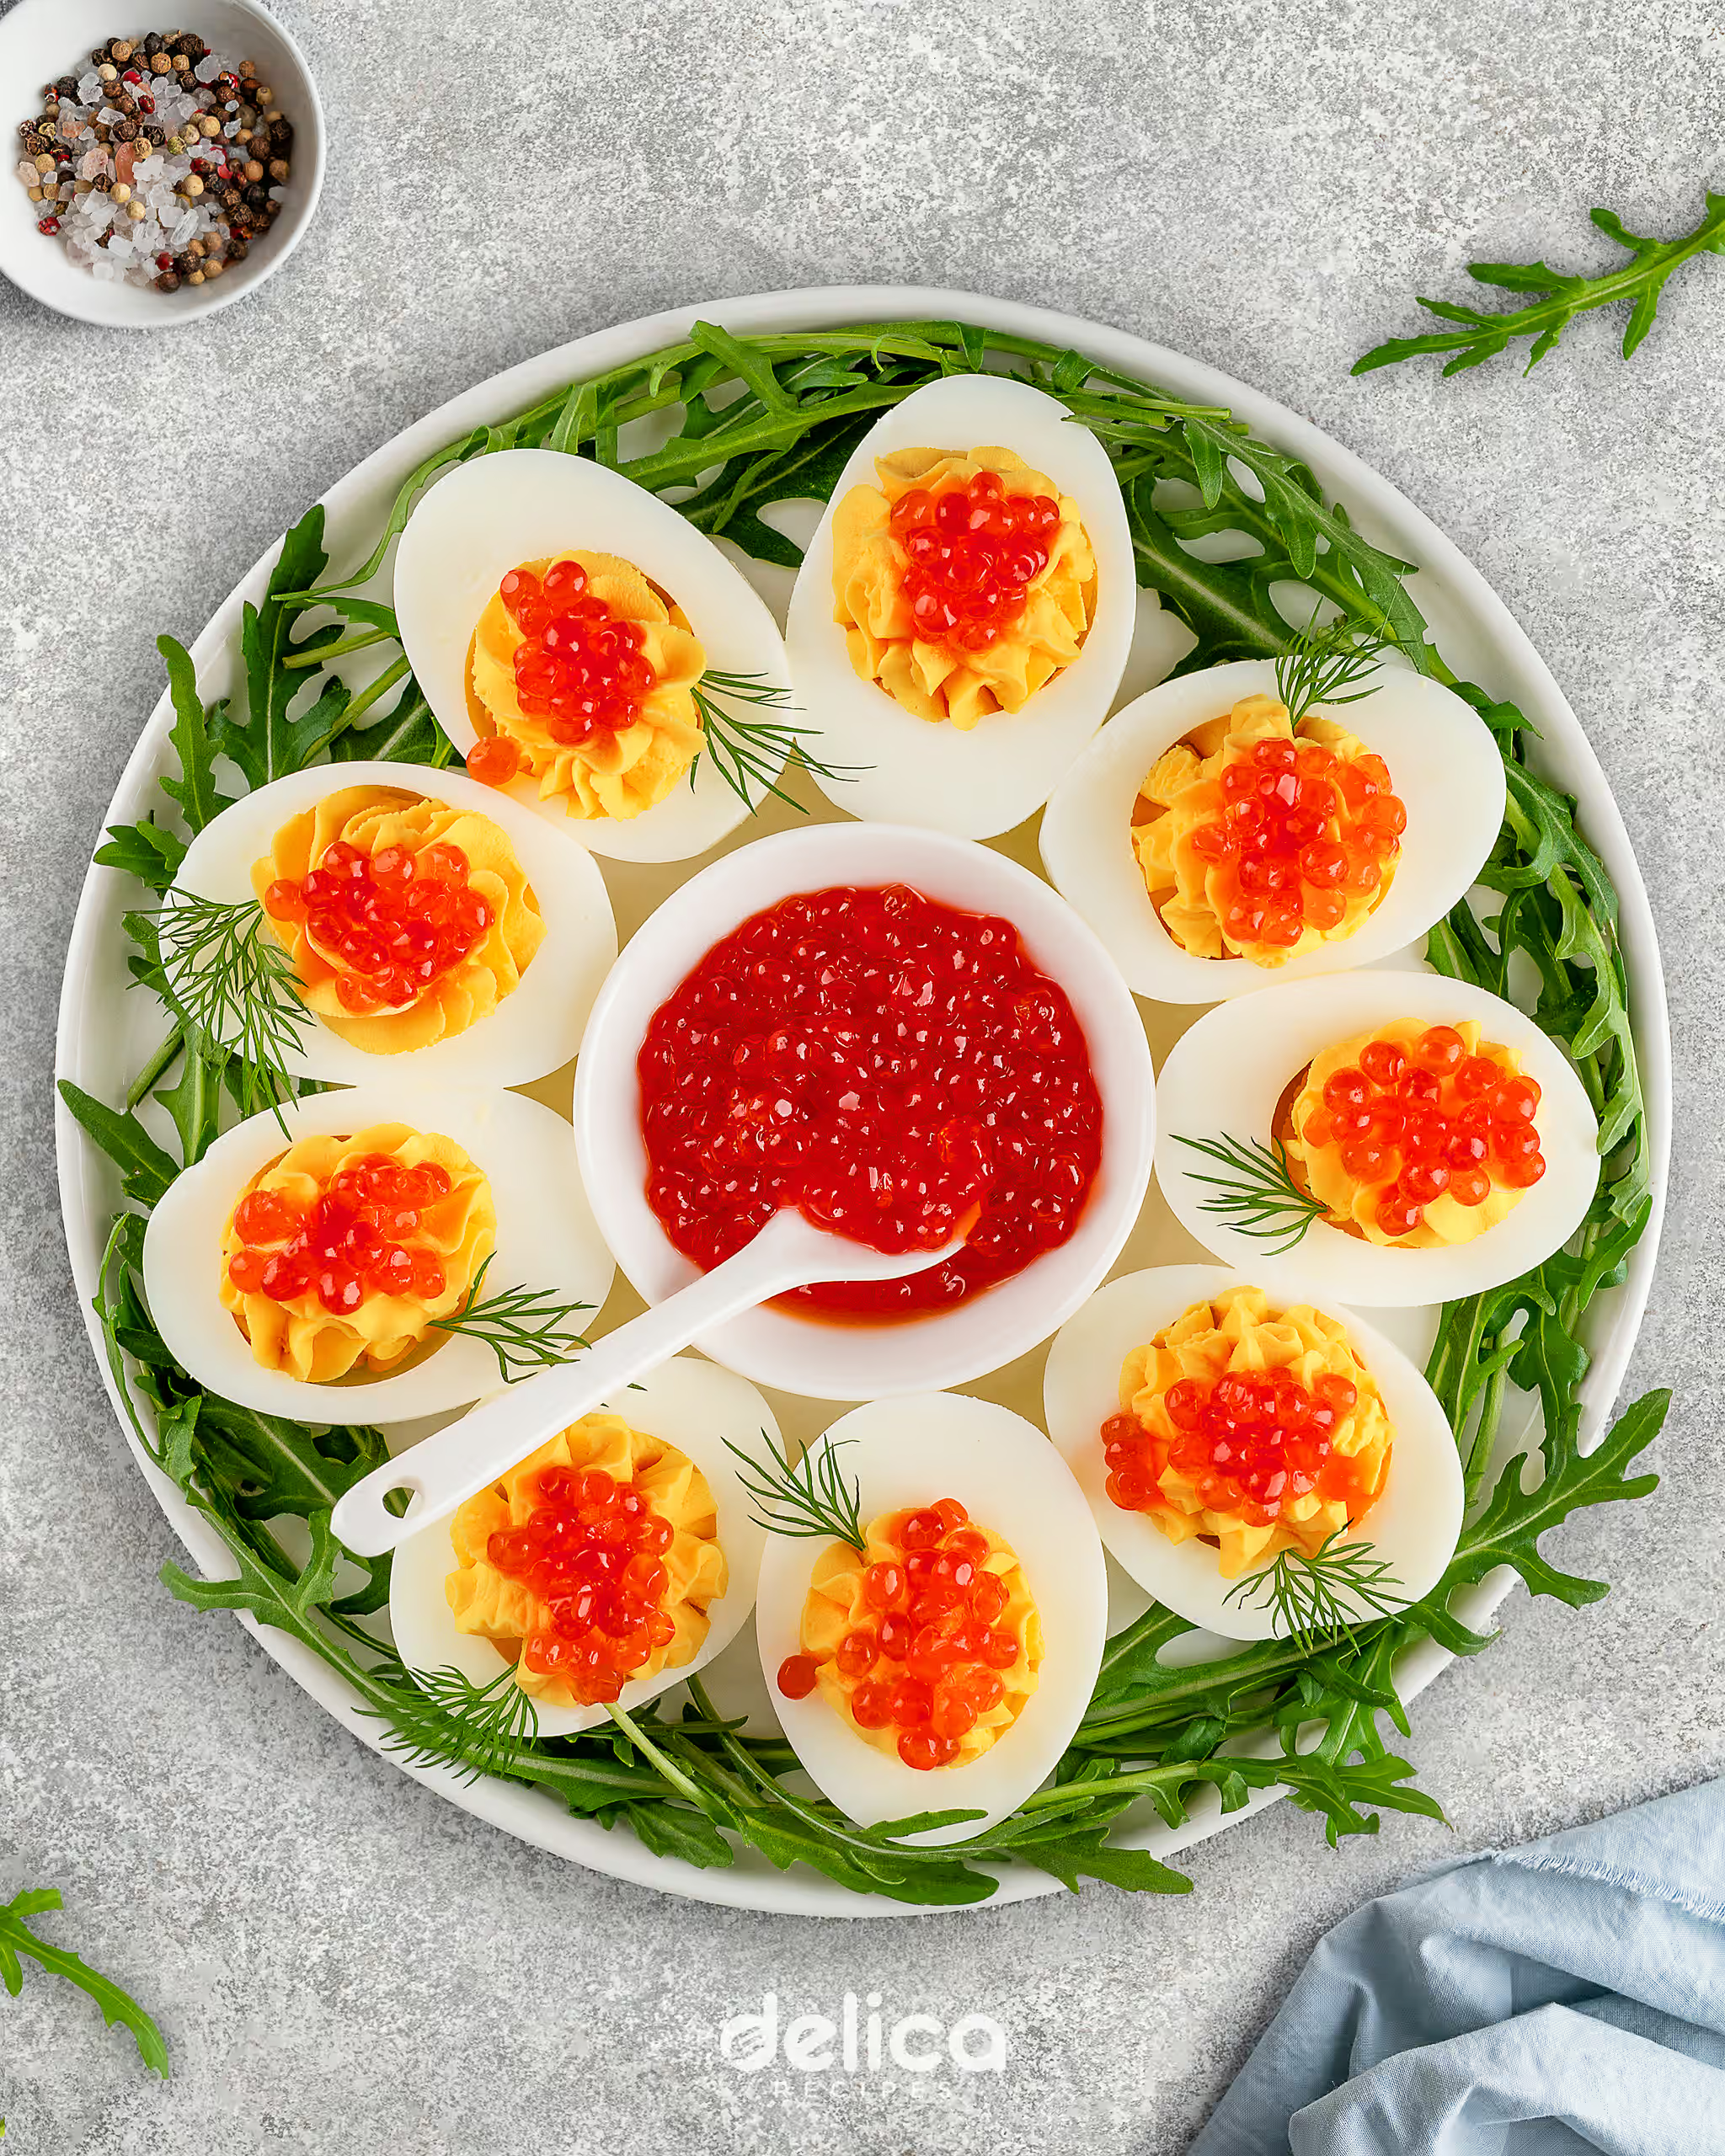
Caviar Deviled Eggs
This is the dressed-up version for when you want the platter to look extra special. Keep the classic filling and spoon a small amount of caviar on top of each egg just before serving – and I mean just before. Caviar releases liquid as it sits and will make the filling messy if you add it too early. A little fresh dill on the side and these look genuinely stunning on the table.
Dill Pickled Deviled Eggs
If you’re a pickle person, these are for you. Swap the vinegar in the classic filling for a splash of dill pickle juice and stir in a teaspoon of finely chopped dill pickles. Tangier, brinier, and more savory than the basic deviled eggs recipe – in the best possible way. Top with a thin pickle slice and a little fresh dill.
Beet Pickled Deviled Eggs
This one’s more of a project, but worth it for special occasions. After boiling and peeling the eggs, soak them whole in a beet pickling brine for at least 4 hours or overnight for a deeper color. The whites turn a stunning magenta-pink and take on a sweet, earthy tang that’s completely different from anything else on this list. Fill with the classic yolk mixture and finish with fresh dill.
Which variation are you going to try first? Or do you have your own twist on deviled eggs that I didn’t mention? Share it the comments – I’m always curious what other people do with theirs.
Make-Ahead & Storage Tips
Deviled eggs are one of the easiest appetizers to prep ahead, which is a big part of why I love making them for gatherings. You can boil the eggs up to 1 week in advance and keep them in the fridge in their shells. The filling can also be made 1-2 days ahead and stored in an airtight container in the fridge.
If you want them to look their best, I’d still wait to fill or pipe them closer to serving. Once assembled, they’re ideally eaten within 1-2 days, while the whites still look fresh and the filling still holds nicely.
And as with any egg dish, don’t leave deviled eggs out at room temperature for more than 2 hours. If you’re serving them at an outdoor event, it’s a good idea to keep the platter over ice.
Time to make some deviled eggs!

Deviled Eggs
Equipment
- Medium Saucepan or Pot
- Slotted Spoon or Spider Strainer
- Large Bowl(for cold water)
- Mixing Bowl
- Cutting Board
- Knife
- Hand Blender or Fork
- Piping Bag + Large Star Tip(optional)
- Measuring Spoons
Ingredients
- Eggs(large)6 pcs
- Mayonnaise2 tbsp
- Dijon Mustard(or Yellow Mustard)1 tsp
- Apple Cider Vinegar(or White Wine Vinegar)1 tsp
- Unsalted Butter(very soft but not melted)2 tsp
- Salt⅛ tsp
- Black Pepper⅛ tsp
- Microgreens, Chives or Paprika(for garnish, optional)
Instructions
- Bring a medium saucepan of water to a boil, then lower the heat slightly so it keeps a steady boil. Carefully lower the cold eggs into the water using a slotted spoon or spider strainer. Gently stir for the first 2 minutes to keep the eggs slowly swirling, then let them cook for 10 minutes.
- Transfer the eggs to a large bowl of cold tap water and let them sit for 10 minutes. This stops the cooking and helps the shells peel more easily.
- Tap each egg at the wide end where the air pocket sits, then peel under cold running water. Then slice each egg in half lengthwise with a sharp knife, wiping the blade between cuts. Remove the yolks with a small spoon and place them in a mixing bowl.
- Add mayonnaise, mustard, vinegar, butter, salt, and black pepper to the yolks. Break the yolks up roughly, then blend until completely smooth. If you do not have a hand blender, mash and mix as smoothly as possible with a fork.
- Transfer the filling to a piping bag fitted with a large star tip and pipe it into the egg white halves. Alternatively, use a spoon or a zip-top bag with one corner snipped to about ½ inch.
- Top with microgreens or snipped chives or dust lightly with paprika if desired. Serve immediately or cover and refrigerate until ready to serve.
Notes
- Use slightly older eggs if you can. Very fresh eggs are usually harder to peel cleanly.
- Start with cold eggs straight from the fridge. Lowering them into already-boiling water helps the shells peel more easily later.
- Stir the eggs gently for the first couple of minutes after they go into the pot. That small step helps keep the yolks centered, which gives you neater halves for filling.
- Use very soft butter, not melted. Just leave it out at room temperature for 30 minutes before you start – it should be soft enough to press easily with your finger. Melted butter can make the filling too loose.
- For the smoothest filling, use a hand blender instead of a fork. It gives a creamier texture and a much cleaner piped swirl.
- If you want the eggs to look their best, pipe the filling instead of spooning it in. Even a zip-top bag with the corner snipped off works well.
Nutrition Information
Serving Size: 29 g
| PER SERVING | AVG. QTY* | %DV** |
|---|---|---|
| Calories | 63 kcal | 3% |
| Protein | 3.2 g | 6% |
| Fat | 5.2 g | 8% |
| Saturated | 1.5 g | 8% |
| Unsaturated | 3.7 g | 9% |
| Carbohydrate | 0.3 g | 0% |
| Sugars | 0.3 g | 0% |
| Sodium | 76 mg | 3% |
| Cholesterol | 96 mg | 32% |
* Nutritional values are approximate and provided for general guidance only. Actual values may vary depending on ingredients and exact quantities used.
** Percent Daily Values are calculated based on a standard 2,000-calorie daily diet. Individual nutritional needs may differ depending on personal calorie requirements.
Share with Friends
Good food is better when shared. It also helps us create more recipes for you.
Frequently Asked Questions
How to make deviled eggs?
Hard-boil the eggs, cool in a cold tap water, peel, halve, and mash the yolks with mayo, mustard, vinegar, butter, salt, and pepper until smooth. Fill the whites and garnish.
How long to boil eggs for deviled eggs?
Boil large eggs for 10 mins once they go into boiling water. For very large eggs, add 1 extra minute. For medium eggs, 9 mins is usually enough. That gives you bright yellow yolks that blend smoothly.
What are the best eggs for deviled eggs?
Large eggs are the best choice for deviled eggs. They give you whites big enough to hold the filling nicely, and slightly older eggs are much easier to peel.
What are deviled eggs?
Deviled eggs are a popular appetizer made from hard-boiled eggs that are peeled, halved lengthwise, and filled with a creamy, tangy yolk mixture piped or spooned back into the whites.
How to make deviled eggs filling?
To make classic deviled egg filling, mash or blend the cooked yolks with mayo, mustard, vinegar, softened butter, salt, and pepper until smooth, creamy, and easy to pipe.